Building a Tabris.js App
Tabris.js utilizes Apache Cordova to build and package apps. To build an app on your local machine, you need to setup developer tools like Xcode, Visual Studio or the Android SDK. You can also build on a build service like GitHub Actions.
Project Layout
To prepare your project for the build, you have to create a subdirectory named cordova that contains the build configuration. The layout of a Tabris.js project might look like this:
/
|- cordova/
    |- config.xml
|- src/
    |- <.js files>
|- test/
    |- <.spec.js files>
|- package.json
|- .tabrisignore
The package.json file
See npm documentation for information about the package.json format.
package.json contains, among other configurations, references to the app’s main script and npm module dependencies:
{
  // ...
  "main": "src/app.js",
  "dependencies": {
    "tabris": "^3.0.0",
    "left-pad": "^1.1.3",
    // ...
  }
  // ...
}
Dependencies are automatically installed during the build process.
NPM Build scripts
When a Tabris.js app is built, the build scripts given in the package.json are executed before the JavaScript code is bundled into the app. They can be used to transpile (source-to-source transform) the JavaScript app code.
{
  ...
  "scripts": {
    ...
    "build": "..."
  }
  ...
}
Supported build script names are:
"build:android": executed only for Android builds"build:ios": executed only for iOS builds"build": executed last for any platform
Example: TypeScript
Generate a Tabris.js app using the tabris init command and select “Compiled” as the project type. The resulting package.json is already configured to use the TypeScript compiler. The details are explained here.
Example: Babel.js
Babel.js may be used to add support for specific JavaScript features not natively supported by Tabris.js.
To do so, install the Babel transpiler and the necessary plug-ins. The --save-dev option will add the dependencies to your package.json:
npm install --save-dev @babel/core @babel/cli @babel/plugin-transform-modules-commonjs @babel/plugin-transform-async-to-generator
Create a .babelrc file in the root of your project:
{
  "plugins": [
    "@babel/plugin-transform-modules-commonjs",
    "@babel/plugin-transform-async-to-generator"
  ]
}
Include the following build script in the scripts sections of your package.json:
{
  "scripts": {
    "build": "babel --compact false src -d dist"
  }
  ...
}
Let the main field point to the compiled version of app.js in dist/:
{
  "main": "dist/app.js",
  ...
}
To test the setup run npm run build or simply tabris serve.
The config.xml file
The minimal build configuration you need is a cordova/config.xml file that describes your app. It contains information like the id of your app, its version, app icons and splash screens. The format of the config.xml is the same as a standard Cordova config.xml file. A minimal example config could look like this:
<?xml version='1.0' encoding='utf-8'?>
<widget id="my.first.app" version="1.0.0">
  <name>HelloWorld</name>
  <description>
    A sample Tabris.js application.
  </description>
  <author email="dev@tabrisjs.com" href="https://tabrisjs.com">
    Tabris.js Team
  </author>
</widget>
Integrating Cordova plugins
To add a set of Apache Cordova plug-ins you only need to add them to config.xml using the <plugin /> tag. It allows you to add plug-ins using an ID, an HTTP URL or a git URL.
For example, to add the Cordova Camera Plugin, you’d add this line:
<plugin name="cordova-plugin-camera" spec="^2.3.0" />
You can integrate all available Cordova Plugins by including them in your config.xml.
Important: You can install all available Cordova Plugins. Most of the Plugins will work out of the box. However, since Tabris.js uses a native UI and no HTML5, plugins that rely on an HTML5 UI (i.e. the DOM) won’t work.
The content element
The optional <content> element defines the app’s starting page in ordinary Cordova apps. In Tabris.js you can use it to define an alternative location of the package.json file. Example:
<content src="mySubFolder/package.json" />
Preferences
In addition to the settings described in the Cordova config.xml Guide, Tabris.js also accepts the following custom preferences:
| Name | Allowed Values | Default Value | Description |
|---|---|---|---|
| EnableDeveloperConsole | true/false | false | Enables/Disables the Tabris.js Developer Tools. Setting the value to $IS_DEBUG will make the value follow the value for debug mode |
| UseStrictSSL | true/false | true | Activate/Deactivate SSL certificate validation on XHR. When disabled self signed SSL certificates are accepted. Should be enabled in production. |
Example:
<preference name="EnableDeveloperConsole" value="true" />
Android specific preferences
| Name | Value |
|---|---|
| Theme | - @style/Theme.Tabris- @style/Theme.Tabris.Light- @style/Theme.Tabris.Light.DarkAppBar (Default)In addition to the bundled Tabris themes, a resource reference to a custom Android theme can be specified. Custom themes have to inherit from one of the Tabris base themes. Example: <preference name="Theme" value="@style/Theme.MyAppTheme" /> |
| ThemeSplash | - @style/Theme.Tabris.SplashScreen- @style/Theme.Tabris.Light.SplashScreen (Default)The splash screen is shown to the user while the app is starting up. By default this screen has a white background. The ThemeSplash preference allows to set one of the bundled themes or to provide a custom theme.Example: <preference name="ThemeSplash" value="@style/Theme.Tabris.SplashScreen" />Note that the config.xml element <splash .. /> can be used to set an image on the splash screen. For styling guides see the material design guidelines on launch screens. |
For more information, see Theming an Android app.
The .tabrisignore file
The tabris.js build packages the contents of your project into the app. You can exclude certain files or directories that are not required in the packaged app, such as tests or developer documentation. Files and directories to be ignored by the build can be listed in a file named .tabrisignore. The format of this ignore file follows the same rules as a .gitignore file.
The following folders are excluded by default and don’t have to be listed in the .tabrisignore:
.git/node_modules/build/- The file
.tabrisignoreitself
Settings
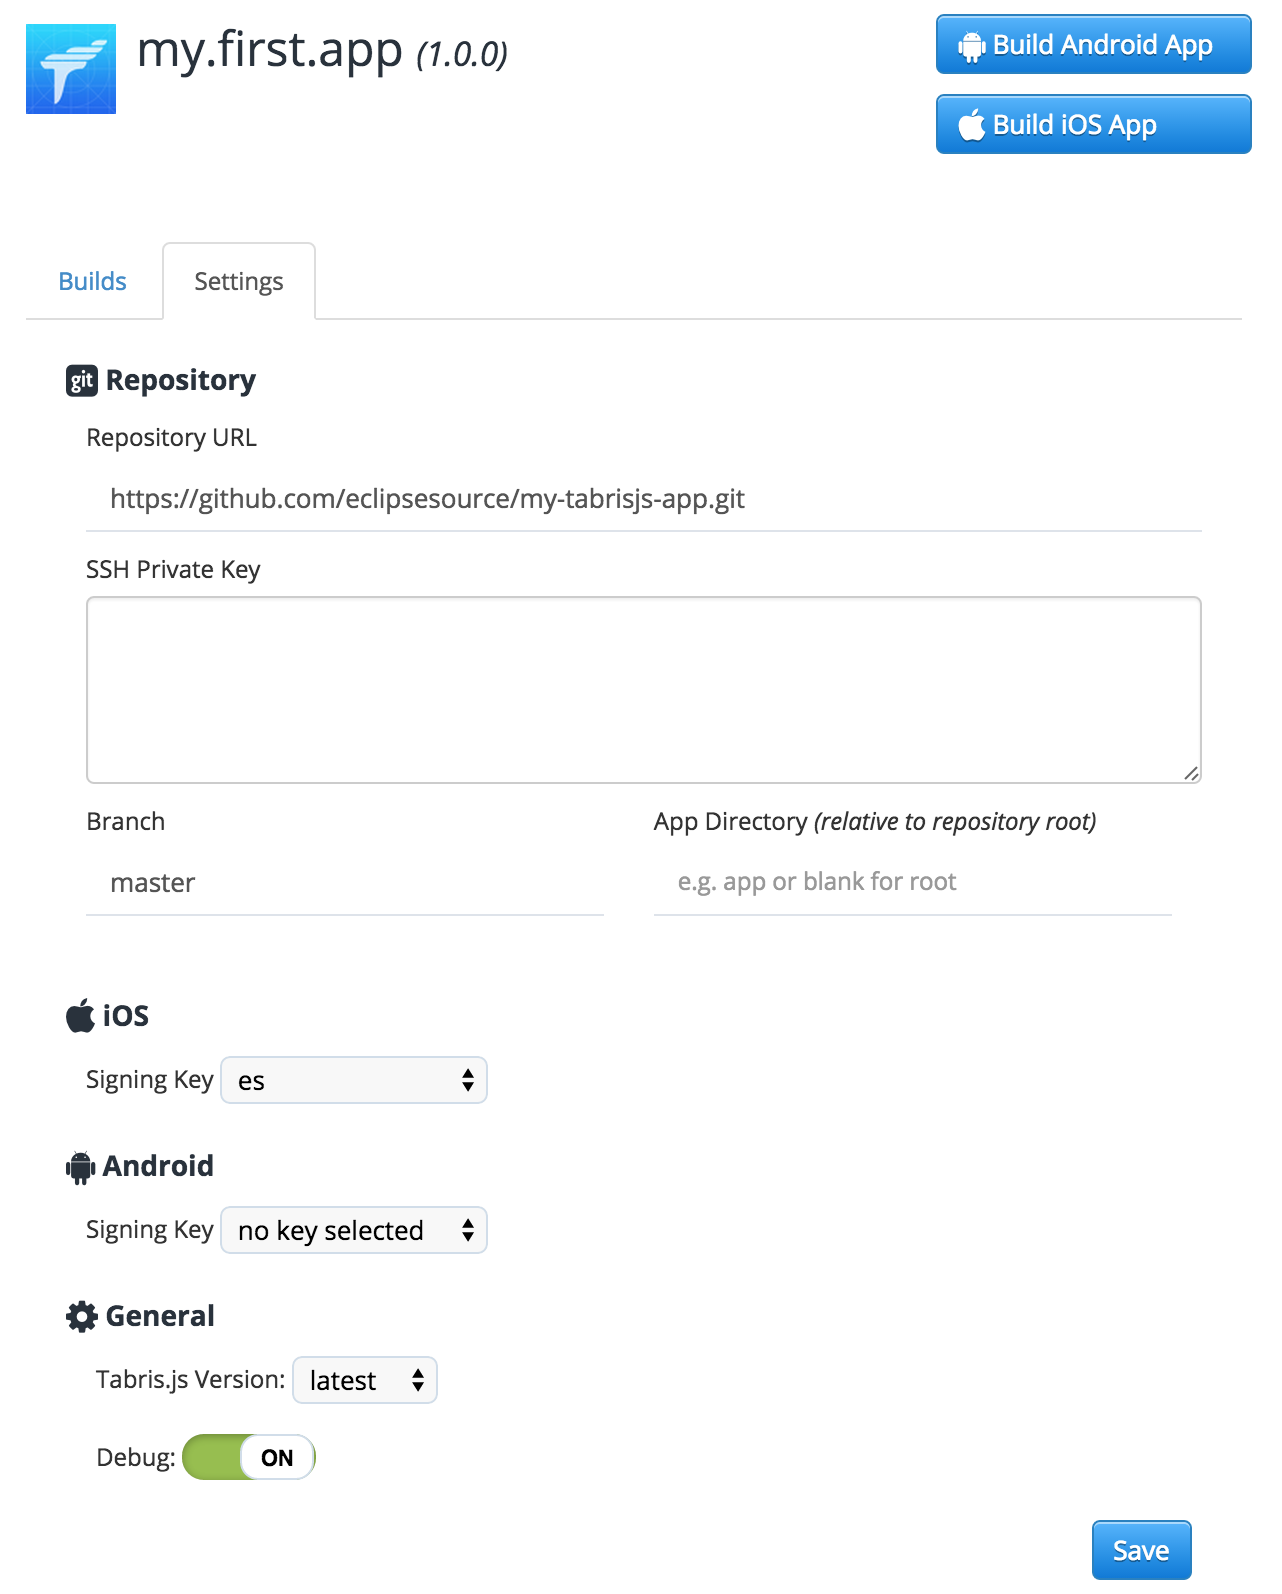
- Repository URL: This is the URL of your git repository. If you’re using the free build, it should point to a GitHub repository. Users who are on the Pro plan can also use custom repository locations.
- SSH Private Key: A SSH private key to access your repository. Only relevant for git repositories which are not hosted on GitHub.
- Branch: The git branch to build from. The default value is
master. If you want to build from a feature branch, you may specify the branch here. - App Directory: The directory within your repository that contains your Tabris.js app. The value must be relative to the repository root.
- iOS Signing Key: iOS apps can not be deployed to a mobile device without being signed. If you want to build an iOS app you need an Apple Developer account and provide the certificate together with the provisioning profile. A very good tutorial on how to get these files can be found in the Cordova Build documentation.
- Android Signing Key: Android apps need to be signed with a certificate only if you want to deploy them to Play Store. You can find a very good tutorial in the Cordova Build documentation as well.
- Environment Variables: Key/Value pairs that will be stored and transferred encrypted to the build machines. They can be used within the config.xml or custom hooks. Use cases are adding plug-ins from private git repositories or handling access keys.
- Builds to keep: Specifies the number of builds that should be kept before deleting them automatically.
- Tabris.js Version: The Tabris.js client version to use in the app. In contrast to the “tabris” dependency to your
package.jsonwhich defines the version of the JavaScript module, this setting defines the version of the native client that will interpret your JavaScript code. In most cases, the valuelatestis good enough here. But if you want to stick to a fixed Tabris.js version you can configure it here. - Debug: Enables the debug mode. If set to
ON, your app will be built including debug symbols and enabled developer tools. (AssumingEnableDeveloperConsoleis set to$IS_DEBUGin your config.xml.) That enables code side-loading, logging and attaching a debugger. Please be aware that debug versions can not be submitted to the app stores. DebugOFFmeans your app will be built to be ready for release.
Local Build
You can build Tabris.js apps on your local machine using the Tabris CLI.
Prerequisites
To build apps on your machine, the development environment for the target platform must be installed. If you’re targeting iOS, you need macOS with a recent version of Xcode. Android apps can be build on any OS with the latest Android SDK installed.
The Tabris CLI must be installed globally on your system:
npm install -g tabris-cli
Building an App
To build your app, run
tabris build [android|ios]
For more command-line options, please refer to the CLI documentation.
:point-right: If the Tabris CLI asks for a build key or fails to download the Tabris.js platform with an HTTP 400 error, make sure you have at least version 3.9.1 of the CLI installed.
Build Service
The Tabris.js build service has been discontinued. We now recommend building with GitHub actions. You can find a migration guide and example app here.